The photos stored in Verizon Cloud hold precious memories, capturing life’s moments and milestones. But when you need to access them all on your computer, the process might not be immediately intuitive. This exclusive article guides you through the steps of downloading all your photos from Verizon Cloud to your computer, ensuring your treasured memories are readily available.

Understanding Limitations: Batch Downloads Not Supported
While Verizon Cloud allows you to download individual photos or select multiple photos at once, it currently doesn’t offer a built-in option to download all your photos in a single batch. However, there’s a workaround using the Verizon Cloud website.
The Download Method: A Step-by-Step Guide
Here’s a detailed breakdown of how to download all your photos from Verizon Cloud:
- Access Verizon Cloud: Using a web browser on your computer, navigate to the Verizon Cloud website (https://www.verizon.com/support/knowledge-base-126159/). Sign in to your Verizon account using your username and password.
- Locate Photos & Videos: On the Verizon Cloud website, locate the section dedicated to photos and videos. This might be labeled “Photos” or “Photos & Videos” depending on the website layout.
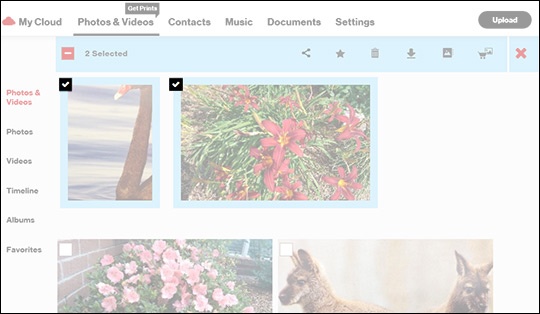
- Select All Photos (The Tricky Part): While Verizon Cloud doesn’t have a built-in “select all” function for photos, there’s a workaround. Hold down the Ctrl key (on Windows PC) or Command key (on Mac) and click on each photo individually. This will manually select all your photos.
Important Note: This process can be tedious if you have a large number of photos. Consider sorting your photos by date or name to potentially expedite the selection process.
- Initiate Download: Once all your photos are selected (indicated by checkboxes or highlighted appearances), locate the download option. This might be an icon resembling a downward arrow or a button labeled “Download.” Click on the download option.
- Choose Download Location: Select the desired location on your computer where you want to save all the downloaded photos. Choose a folder with enough storage space to accommodate all your pictures.
- Download Confirmation and Patience: Confirm the download and be patient. Downloading a large number of photos might take some time depending on your internet speed.
Remember: The specific steps and interface might vary slightly depending on the version of the Verizon Cloud website you’re using.

Alternative Solutions (for Consideration):
If the manual selection process seems daunting, here are a few alternative solutions to consider, though they might not be ideal for everyone:
- Third-Party Data Transfer Software:Explore data transfer software designed to migrate data from cloud storage services. These tools might offer batch download functionalities. However, proceed with caution and thoroughly research the software’s reputation and security practices before using it.
- Download in Smaller Batches:If you have a very large photo collection, consider downloading them in smaller batches (e.g., by date or album) to make the process more manageable.
The Final Frame: Preserving Your Memories
By following these steps and considering alternative solutions if needed, you can successfully download all your photos from Verizon Cloud to your computer. Remember, having a local backup of your photos ensures you can access them even if you encounter internet connectivity issues or changes with Verizon Cloud in the future. So, download, organize, and cherish your irreplaceable memories!
لا تعليق